Member Reports
Clubistry's Member Reports allows you to pull a report of your membership for varying purposes: a full mailing list of the entire roster for use in making mailing labels; members who have opted in for electronic communications for import to a bulk email service; or to sort members by state or region.
Create a Report
To create a report, navigate to Club Management -> Member Reports. You'll see the following form, but listing your club's membership types and custom fields.
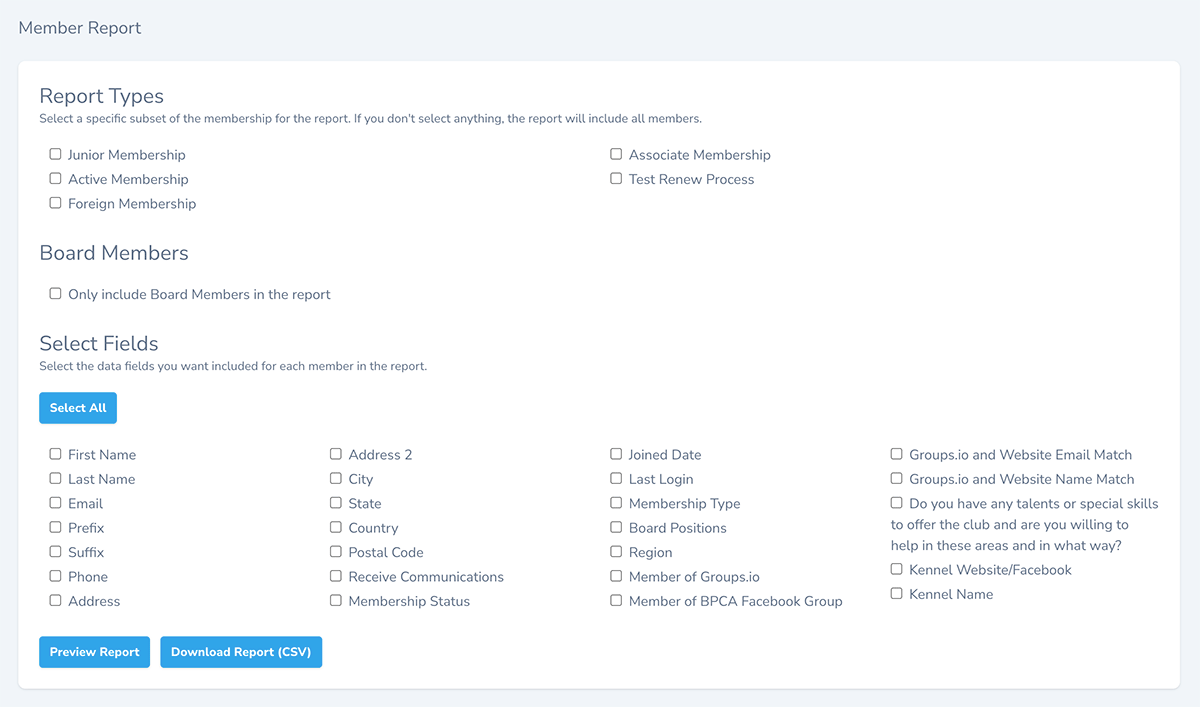
Select Report Type
The options under Report Types are all of your membership types. Selecting a report type basically filters the report to only that membership type. If you do not select a specific membership type, the report will include all members.
Board Members
Alternatively, you can select to pull a report of just board members, by checking the "Only include Board Members in the report" option.
Select Fields
The last section on the page is a list of fields you can include in the report. This list includes the Member Custom Fields which have had "Available for Reports" checked. Select the fields you want to include, or use the Select All button to check all of the fields.
Preview or Download Report
If you click to Preview Report, that page will show the report results on the page, while leaving your report options still selected. You can double check to make sure the information included in the report is what you expected, or make adjustments to the options if needed. Once you're satisfied with the report, you can click on "Download Report (CSV)" to download the report. The file will be a CSV - comma-separated values - file. This file can be opened in Excel, Google Sheets, or another spreadhseet application.
Caution: when opening a CSV file in Excel or another spreadsheet app, the app may try to be helpful in convering data like dates or number (including postal codes) to their special formatting. This can lead to issues like postal codes having leading zeros stripped, or dates being formatted in unintelligible ways. If this happens, close out the file without saving it (so the data in the original file isn't changed). Try re-opening the file in the app again, to see if there's any sort of message that is brought up as the file opens about CSV files, and converting data formatting. If you see this, then decline the reformatting options. Alternatively, you can try opening the file through the File menu (File, Open, and then browse to the CSV file to open it). In Excel, this should bring up a popup about data conversions it wants to run on the file. Click on "Don't Convert".
Examples of How to Use a Report
Once you have your report opened up in a spreadsheet application, you can re-sort it as needed to isolate or group users according to your needs.
- I need a report of all Lapsed members.
Run a report with all membership types (don't check any of them), the data fields you need included (First and Last Name, Email, City, State, etc.), and also include the Membership Status field. Once downloaded and opened up in a spreadsheet application, sort by the Membership Status column. You can then just use the member rows with a status of Lapsed. - I need the members who have opted in for electronic communications for an email blast mailing list.
Run a report including all membership types (unless you only need one or specific membership types, in which case select those). Include the First and Last Name fields, Email, and Receive Commnications. When the report is opened up in a spreadsheet application, sort by Receive Communications. Delete the rows that are "no" on that option, and what remains is your membership email list of people who have opted in. This can then be imported into the application or service you're using to send the email blast.